
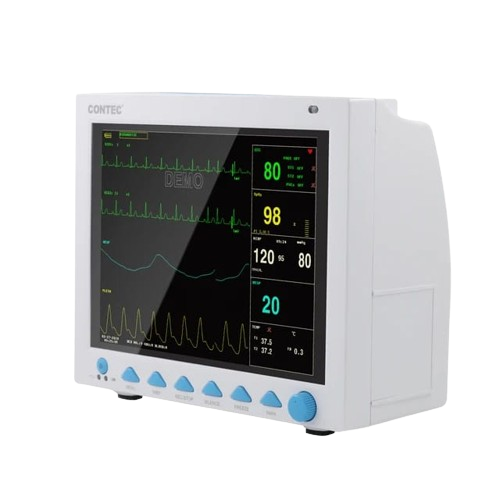
What is a Vital Signs Monitor?
A vital signs monitor is a medical device that measures and displays a patient’s key physiological parameters, such as:
- Heart rate (HR) – beats per minute
- Blood pressure (BP) – systolic/diastolic pressure
- Oxygen saturation (SpO₂) – percentage of oxygen in the blood
- Respiratory rate (RR) – breaths per minute
- Temperature (TEMP) – body temperature
These monitors are commonly used in hospitals, clinics, ambulances, and even at home for continuous health monitoring.
Step-by-Step Procedure for Using a Patient Monitor
1. Preparation
✅ Ensure the Monitor is Ready:
- Check that the device is powered on and functioning properly.
- Ensure all sensors, cables, and accessories are available (ECG electrodes, blood pressure cuff, SpO₂ sensor, and temperature probe).
✅ Explain the Procedure to the Patient:
- Inform the patient that you will be monitoring their vital signs.
- Ensure they are comfortable and in a relaxed position (lying down or sitting).
2. Connecting the Sensors
A. ECG (Heart Rate Monitoring)
✔ Clean the Skin (chest area) with an alcohol swab.
✔ Place the Electrodes:
- 3-Lead Placement
- White: Right upper chest (below collarbone)
- Black: Left upper chest (below collarbone)
- Red: Lower left abdomen
- 5-Lead or 12-Lead ECG may have additional placements.
✔ Attach ECG Cables to the electrodes.
B. Blood Pressure (BP) Monitoring
✔ Wrap the BP Cuff around the patient’s upper arm (2-3 cm above the elbow).
✔ Ensure the Cuff is Snug but Not Too Tight.
✔ Start the BP Measurement (automatic or manual mode).
✔ The cuff will inflate, measure BP, and display the result.
C. Oxygen Saturation (SpO₂) Monitoring
✔ Attach the SpO₂ Sensor to the patient’s fingertip, toe, or earlobe.
✔ Ensure the patient’s hand is still to get an accurate reading.
D. Respiratory Rate (RR) Monitoring
✔ Some monitors calculate RR using the ECG leads or a dedicated chest sensor.
✔ Observe the RR waveform on the screen.
E. Temperature Monitoring
✔ Use the Temperature Probe: Place it under the tongue, armpit, or rectally (depending on the method used).
✔ Wait for the device to display the temperature reading.
3. Start Monitoring
✅ Turn on the Monitor if not already powered on.
✅ Check Lead and Sensor Connections to avoid signal interference.
✅ Observe Readings on the Screen: Ensure all vital signs are displaying correctly.
4. Adjust Alarm Settings (if needed)
✅ Set High & Low Thresholds for heart rate, BP, SpO₂, and other parameters.
✅ If an alarm sounds, check for possible issues (e.g., incorrect sensor placement or abnormal patient readings).
5. Document & Interpret Results
✅ Record the Readings if needed for patient records.
✅ Check for Abnormalities: Compare with normal ranges.
✅ Take Action if Necessary: If any readings are abnormal, inform a doctor or take appropriate medical action.
6. Removing the Sensors & Cleaning Up
✅ Turn Off the Monitor (if no longer needed).
✅ Gently Remove the Electrodes, BP Cuff, and SpO₂ Sensor.
✅ Clean the Patient’s Skin to remove adhesive residues.
✅ Disinfect and Store Equipment properly.
Types of Patient Monitors
- Multiparameter Monitors: Used in hospitals for continuous vital signs monitoring.
- Portable Patient Monitors: Handheld or wearable monitors for home or ambulance use.
- Bedside Monitors: Fixed devices in ICUs and emergency rooms.
- Telemetry Monitors: Wireless monitors for mobile patients.